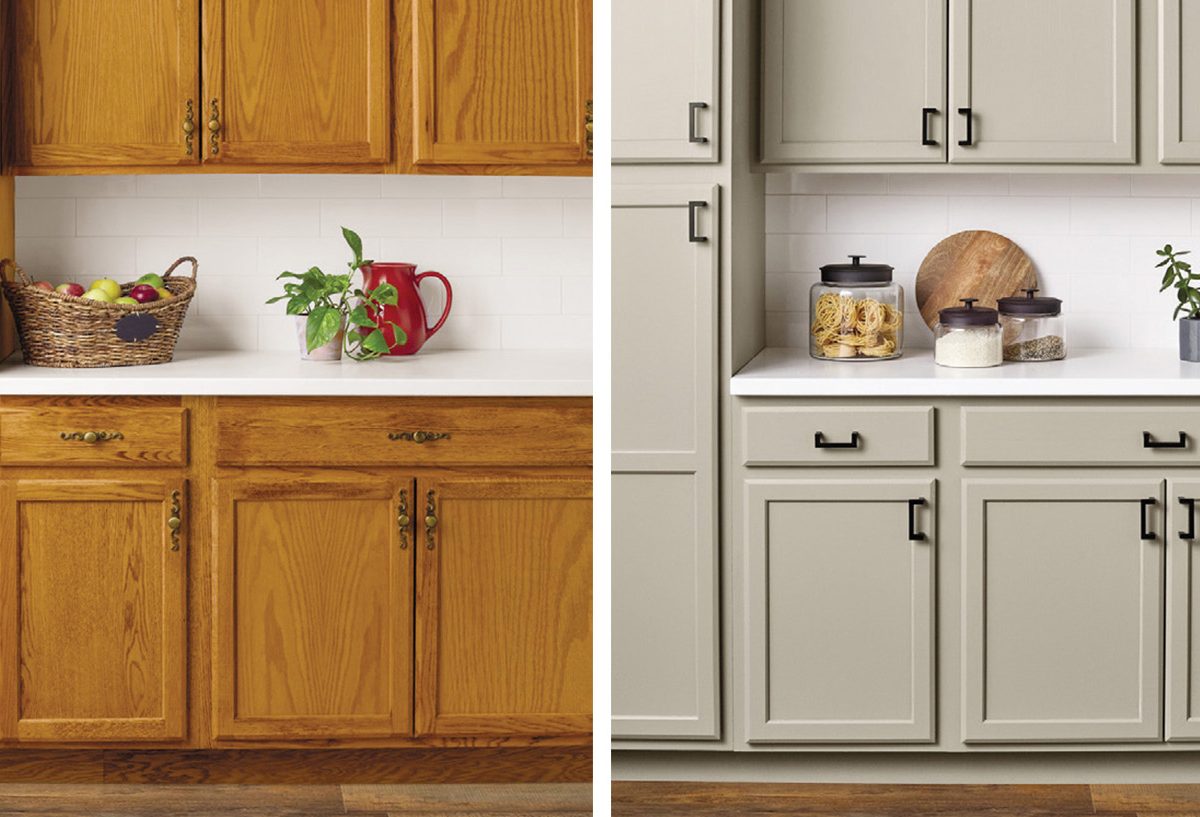
Most of us prefer constant changes to upgrade our lives, especially the space we live in. However, it is not always possible to spend a fortune to vanish that monotonous environment from the surrounding area. Have you wondered how to refinish oak cabinets?
Hence, we would like to choose a refinishing element that obviously lets you spend less as well as reenergize the space. Refinishing elements can be applied to various old things such as furniture, flooring, walls, roofs, and so many others to make them look like brand-new products.
If you are facing the same dull and tiring vibes with your wooden cabinets and want to appear more vibrant and lively, then you are in the right spot. In this article, we will share the easiest way to upgrade your wooden cabinetry on your own.
Using this method, you can refinish oak cabinets, pine cabinets, cedar cabinets, or any wooden cabinets.
So, let’s begin with the topic with a brief understanding of the refinishing component.
Similar Post: 21 Stunning Blue Kitchen Cabinet Ideas to Upgrade Your Kitchen
What is Refinishing?
Refinishing is a process where any old thing can be upgraded by conducting some minor changes. For instance, painting old cabinets, changing the paint of walls, sanding or polishing the old furniture, etc.
Basically, refinishing anything can save the cost of buying a new one or refacing where we need to change all the parts of that old thing. This refinishing component works very well on wooden items.
That’s why many homeowners choose refinishing rather than switching old furniture or refacing it. However, many of you might think that in the refinishing process, you also need to pay the professional.
But let us tell you the simplest way to refinish your old wood cabinets on your own.
How to Refinish Old Oak Cabinets in The Easiest Way?
Refinishing the wooden cabinets is the ultimate way to increase the durability of cabinets and their physical appearance. Using the following simple steps, any homeowner can DIY their wooden cabinets refinishing project.
1. Find out The Exact Material of Cabinet
This step is an essential part of the refinishing process as afterward processes depend on it. Cabinets are constructed generally using two types of material i.e. cabinet boxes made of ply or MDF etc on the other hand, the doors of cabinets are made of wood.
Also Read: 21 Stunning White Cabinet Kitchen Backsplash Ideas
At the same time, some cabinets are made of all hardwood. In this case, it is necessary to acknowledge the exact wood material used to form the doors. To be precise, there are different methods applied to wood cabinet refinishing.
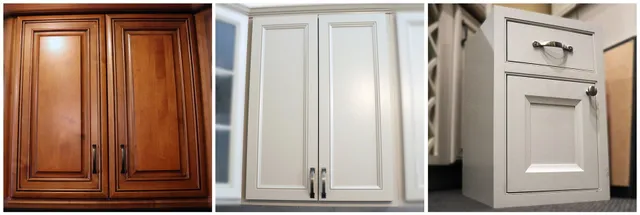
For instance, refinishing oak cabinets differs slightly from refinishing maple cabinets due to their texture, grain patterns, etc. Hence, it’s necessary to know the material of the cabinets.
2. Prepare Cabinets for Refinishing
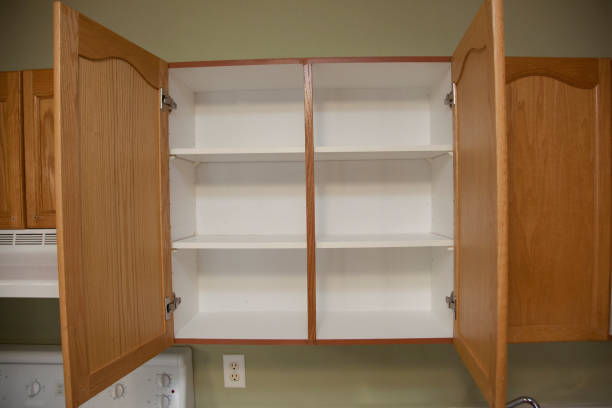
Before starting with the refinishing process, certain things need to be followed to have ease while doing the actual refinishing tasks. Here, we have shared some tips you might use to get better results and comfort in your DIY project.
- Vacant The Cabinets – Make sure to clear out all the stored material from the cabinets you will refresh.
- Disassemble The Doors And Hardware – However, it is possible to do the revamping task without ditching any element of cabinets such as shelves, doors, and hardware like cabinet handles, screws, etc. However, to get better results and convenience, detach them from the cabinets.
- Clean Or Upgrade The Hardware – Make sure to clean and store all detached hardware items properly, as they need to be fixed again to the cabinets after all work is done.
- Changing Cabinet Hardware – It is not mandatory to change the cabinet handle if they are fine. However, this is a good opportunity to replace them if the hardware items are worn out.
- Deep Clean The Surfaces – Deep cleaning the surfaces of cabinets is an important part of making the cabinet space ready for the next revamping tasks. To do so, you can use any cloth to clean the surfaces with mild all-purpose cleaners or for tough stains or mineral spirit. If you don’t want many fuzzy cleaning tasks, you can use advanced cleaning equipment. For instance, drill-powered scrub brushes consume less time and effort. Moreover, you can change the scrub brush as per the need of the surface, so this option will be more convenient to think of.
Steps to Refinish Wooden Oak Cabinets
1. Wooden Cabinet Sanding
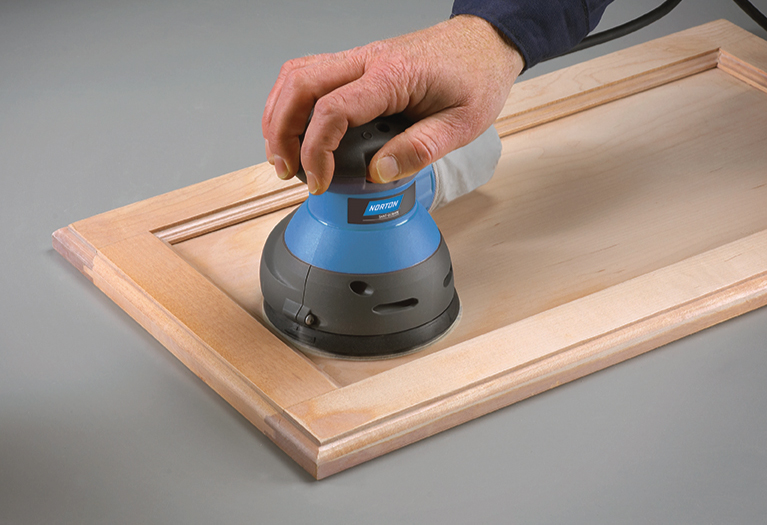
Start With Sanding – Sanding the wooden cabinet doors is a highly recommended task by most DIY experts. The sanding process adds slight roughness to the existing surfaces, which provides a better grip to the new finish and look flawless.
For sanding purposes, use fine-grit sandpaper by folding it in a quarter to use most of it. To make it quick, you can use an orbit sander too. While sanding the surface, always sand the surface in a grain direction to avoid uneven sanding scratches to the surface.
After sanding the cabinets and door surfaces, remove all the dust using an all-purpose cleaning cloth.
Touch Up The Cabinet Wear And Tear Marks – Generally, old cabinets have various wear and tear marks or color fading issues. Hence, before going with the further process, make sure to cover those unpleasant marks of whole cabinets.
There are furniture markers available in the market in a variety of colors. Use a suitable marker to touch up those marks and let them dry. After completely drying up the marker ink, spread the excess ink on the remaining surface and blend in the portion.
2. Wooden Cabinet Priming and Painting
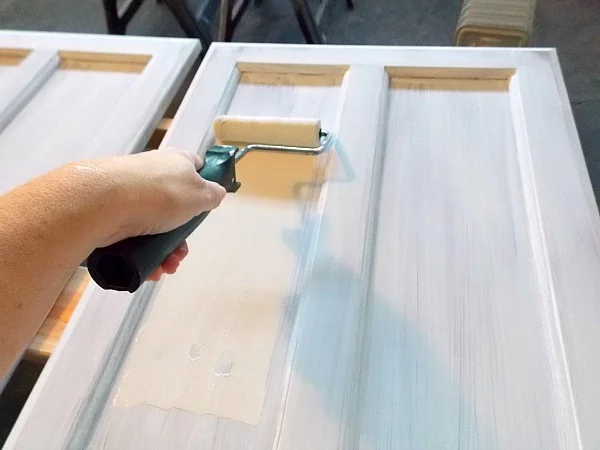
Start Priming The Wooden Cabinets – After proper sanding and touching up the cabinets and detached doors, the next step will be priming. To get good results, try to choose transition primer as it improves the adhesion that will help fresh paint bind properly on the wooden cabinets.
Apart from primer, you will need a paint tray, a regular paintbrush, and a paint roller. As far as paint roller is concerned, microfiber roller or foam roller works best on wooden furniture.
Start With The Paint – The painting process of the wooden cabinets will be the same as priming. Choose acrylic paints with latex base as they are durable and appear fine on all kinds of wooden furniture.
See More: Efficient Techniques for Spray Painting Picture Frames
Start painting the cabinets from edges and joints using the normal paintbrush and surface area with the roller paintbrush. After completing the first coat on the cabinets, let it dry completely.
Apply the second coat of paint on dried cabinets with the same method that is used in priming and first paint coating. Let the recoated cabinets dry out thoroughly.
If you are executing refinishing activity without detachment and in the same place, then put a drop cloth on the existing area to avoid the mess of paint dripping stains.
3. Assemble the Cabinets
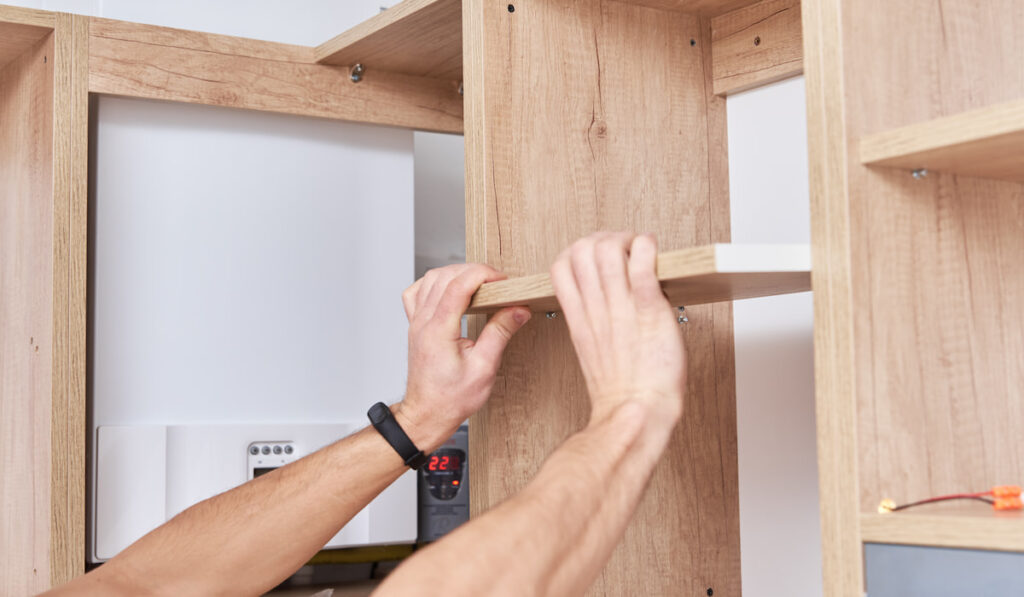
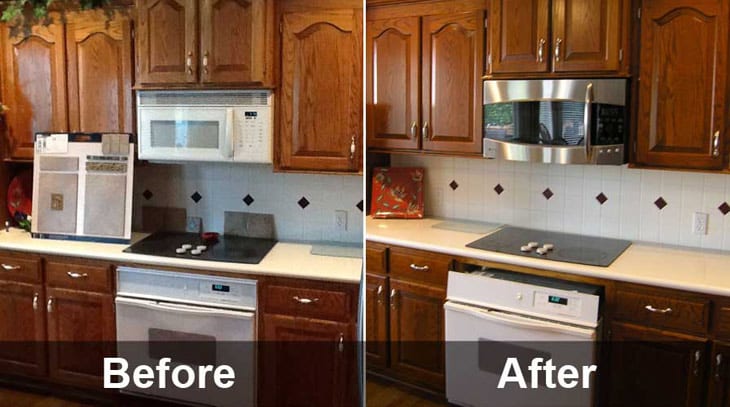
After getting over the cabinet paint, reinstall the detached elements of the cabinets, such as doors, shelves, knobs or handles, etc., using the previously stored screws and hinges.
Somehow, if the hardware part of the cabinets is completely worn out or not getting along with the existing paint, then this will be the perfect time to replace them.
Is There Any Difference in Refinishing Oak Cabinets and Other Wooden Cabinets?
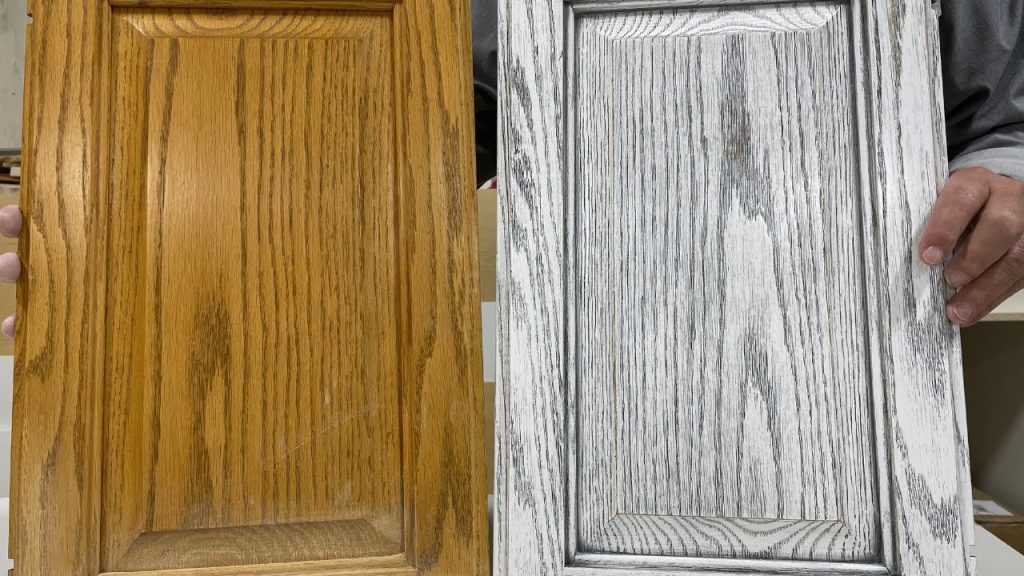
Oak is basically an open-poured wood with deep open grains. Hence, applying the usual paint like other wood furniture will make it look not that satisfying. However, some homeowners don’t mind applying the same refinishing process as other wooden cabinets conduct to refinish oak cabinets.
On the other hand, some of them won’t prefer to have those rough-looking oak cabinets in their homes. Here, we have shared an essential element that you can include in your oak cabinet refinishing project.
Apply this particular task for refinishing oak cabinets to appear more consistent and clean.
Oak Cabinet Pore Filling
There is a timber pore-filling product available in the market. Water-based pour fillers best cover the oak wood’s deep-opened pores and grains.
- Apply water-based pore filler on the oak cabinets using a putty knife and spread it evenly on the surfaces.
- It will take an hour to dry the cabinet surface. After completely drying the pore-filled surface, sand it using sandpaper or an orbit sander.
- Thoroughly cleaning the dust and the rest of the paint process is the same as other wooden cabinet executes.
Adding a pore-filling process to the existing oak cabinet refinishing task will make the old and dull oak cabinet look beautiful with minimum spending.
Quick Tips to Add More Efficiency To Your DIY Wood Cabinet Remodeling Project

Related: 21 Laundry Room Shelving Ideas for Your Laundry Room
- To avoid any allergies due to direct involvement in refinishing tasks such as cabinet dusting or cleaning, sanding dust, or chemical paints, make sure to wear a dust mask throughout every task.
- Temperature is an essential aspect to look for because the cabinet painting process is affected by it i.e. due to extreme humidity, paint will take more time to dry.
- If you are detaching the cabinet front face doors, shelvings, etc., prepare an individual paint station in the house where you can conduct all your paint-related activities. For example garage, or basement, or if you are not available with it, you can craft this station in your living room too by covering up the area with a drop cloth. This way, you can access your mess-free kitchen.
- Store all the detached cabinet hardware and accessories, such as screws, hinges, handles, etc., in a ziplock bag. This way, you will easily attach them back into the place after the refinishing activity.
- Choose paint options as per the wood finish, as most of the time, cabinets are made of different types of materials. Hence, its paint choices could be different, so keep that in mind while selecting the paint.
- For painting tasks, always remember the hack “less is more,” so don’t apply too much paint on wooden cabinets.
Conclusion
If you are bored with the existing wooden elements of your house, such as sofas, cupboards, or cabinets, it is not necessary to replace them. You can make it look like a fresh piece of furniture by applying one simple and low-cost procedure: Refinishing wooden items.
In this article, we have discussed one of the refinishing processes, which is wooden cabinets. Here, we have explained some essential aspects of wood cabinet refinishing. For instance, we have answered the meaning of the wooden items refinishing to provide a better understanding of the topic.
Along with it, you will learn how to DIY your wooden cabinets using easy steps and essential tips to redfish oak cabinets if you own them.
Apart from the overall refinishing process, we have also provided quick tips related to this revamping activity to get successful results out of it. If you are planning to remodel your old wooden cabinetry, then this article will surely be your perfect guide.
Check This Next: 21 Bathroom Door Ideas to Design Your Bath Space